
My favorite apps for successful trip planning
At this point, I’ve planned a lot of trip in my life. Some for large groups, some for just me and my partner, and I’ve developed a system that I really like for helping me get everything organized and to make sure we get to experience as many things as we all want to. I’m very Type-A, so I like to have things organized to a tee, and while I once used to plan trips down to the 5-minute mark, I’ve loosened up a lot more to keep plans more flexible. And I think that’s only made them more enjoyable! I’m still a maximizer though, so I’m definitely still trying to fit as much as I can into a single itinerary.
So here are some of the apps that I like to use nowadays that I think really help with planning a trip! There’s a lot to consider especially when you’re planning for/with a large group since you want everyone to be able to have input, and you want to be able to easily disseminate information to everyone as easily as possible.
I’ll never pretend that I’m an expert at trip planning, but it can be daunting task for anyone who over-stresses about things (me). So if this can provide you with any bit of guidance, I hope I can be of service!
Google Sheets & Google Maps
These were my two main applications that have helped me plan many a trip. While I’ve since adjusted my planning to use another app that I’ll mention next, I still think these two have to be mentioned. They essentially took care of everything, when it came to ease of sharing with everyone in the party to organization and post-trip summaries, they were pretty much all I needed.
If you’d like to give my system a try after reading up on it, feel free to make your trip itinerary based off of my trip template! Just make a copy of it to your own Google Drive to get started!
How I use it
Google Sheets
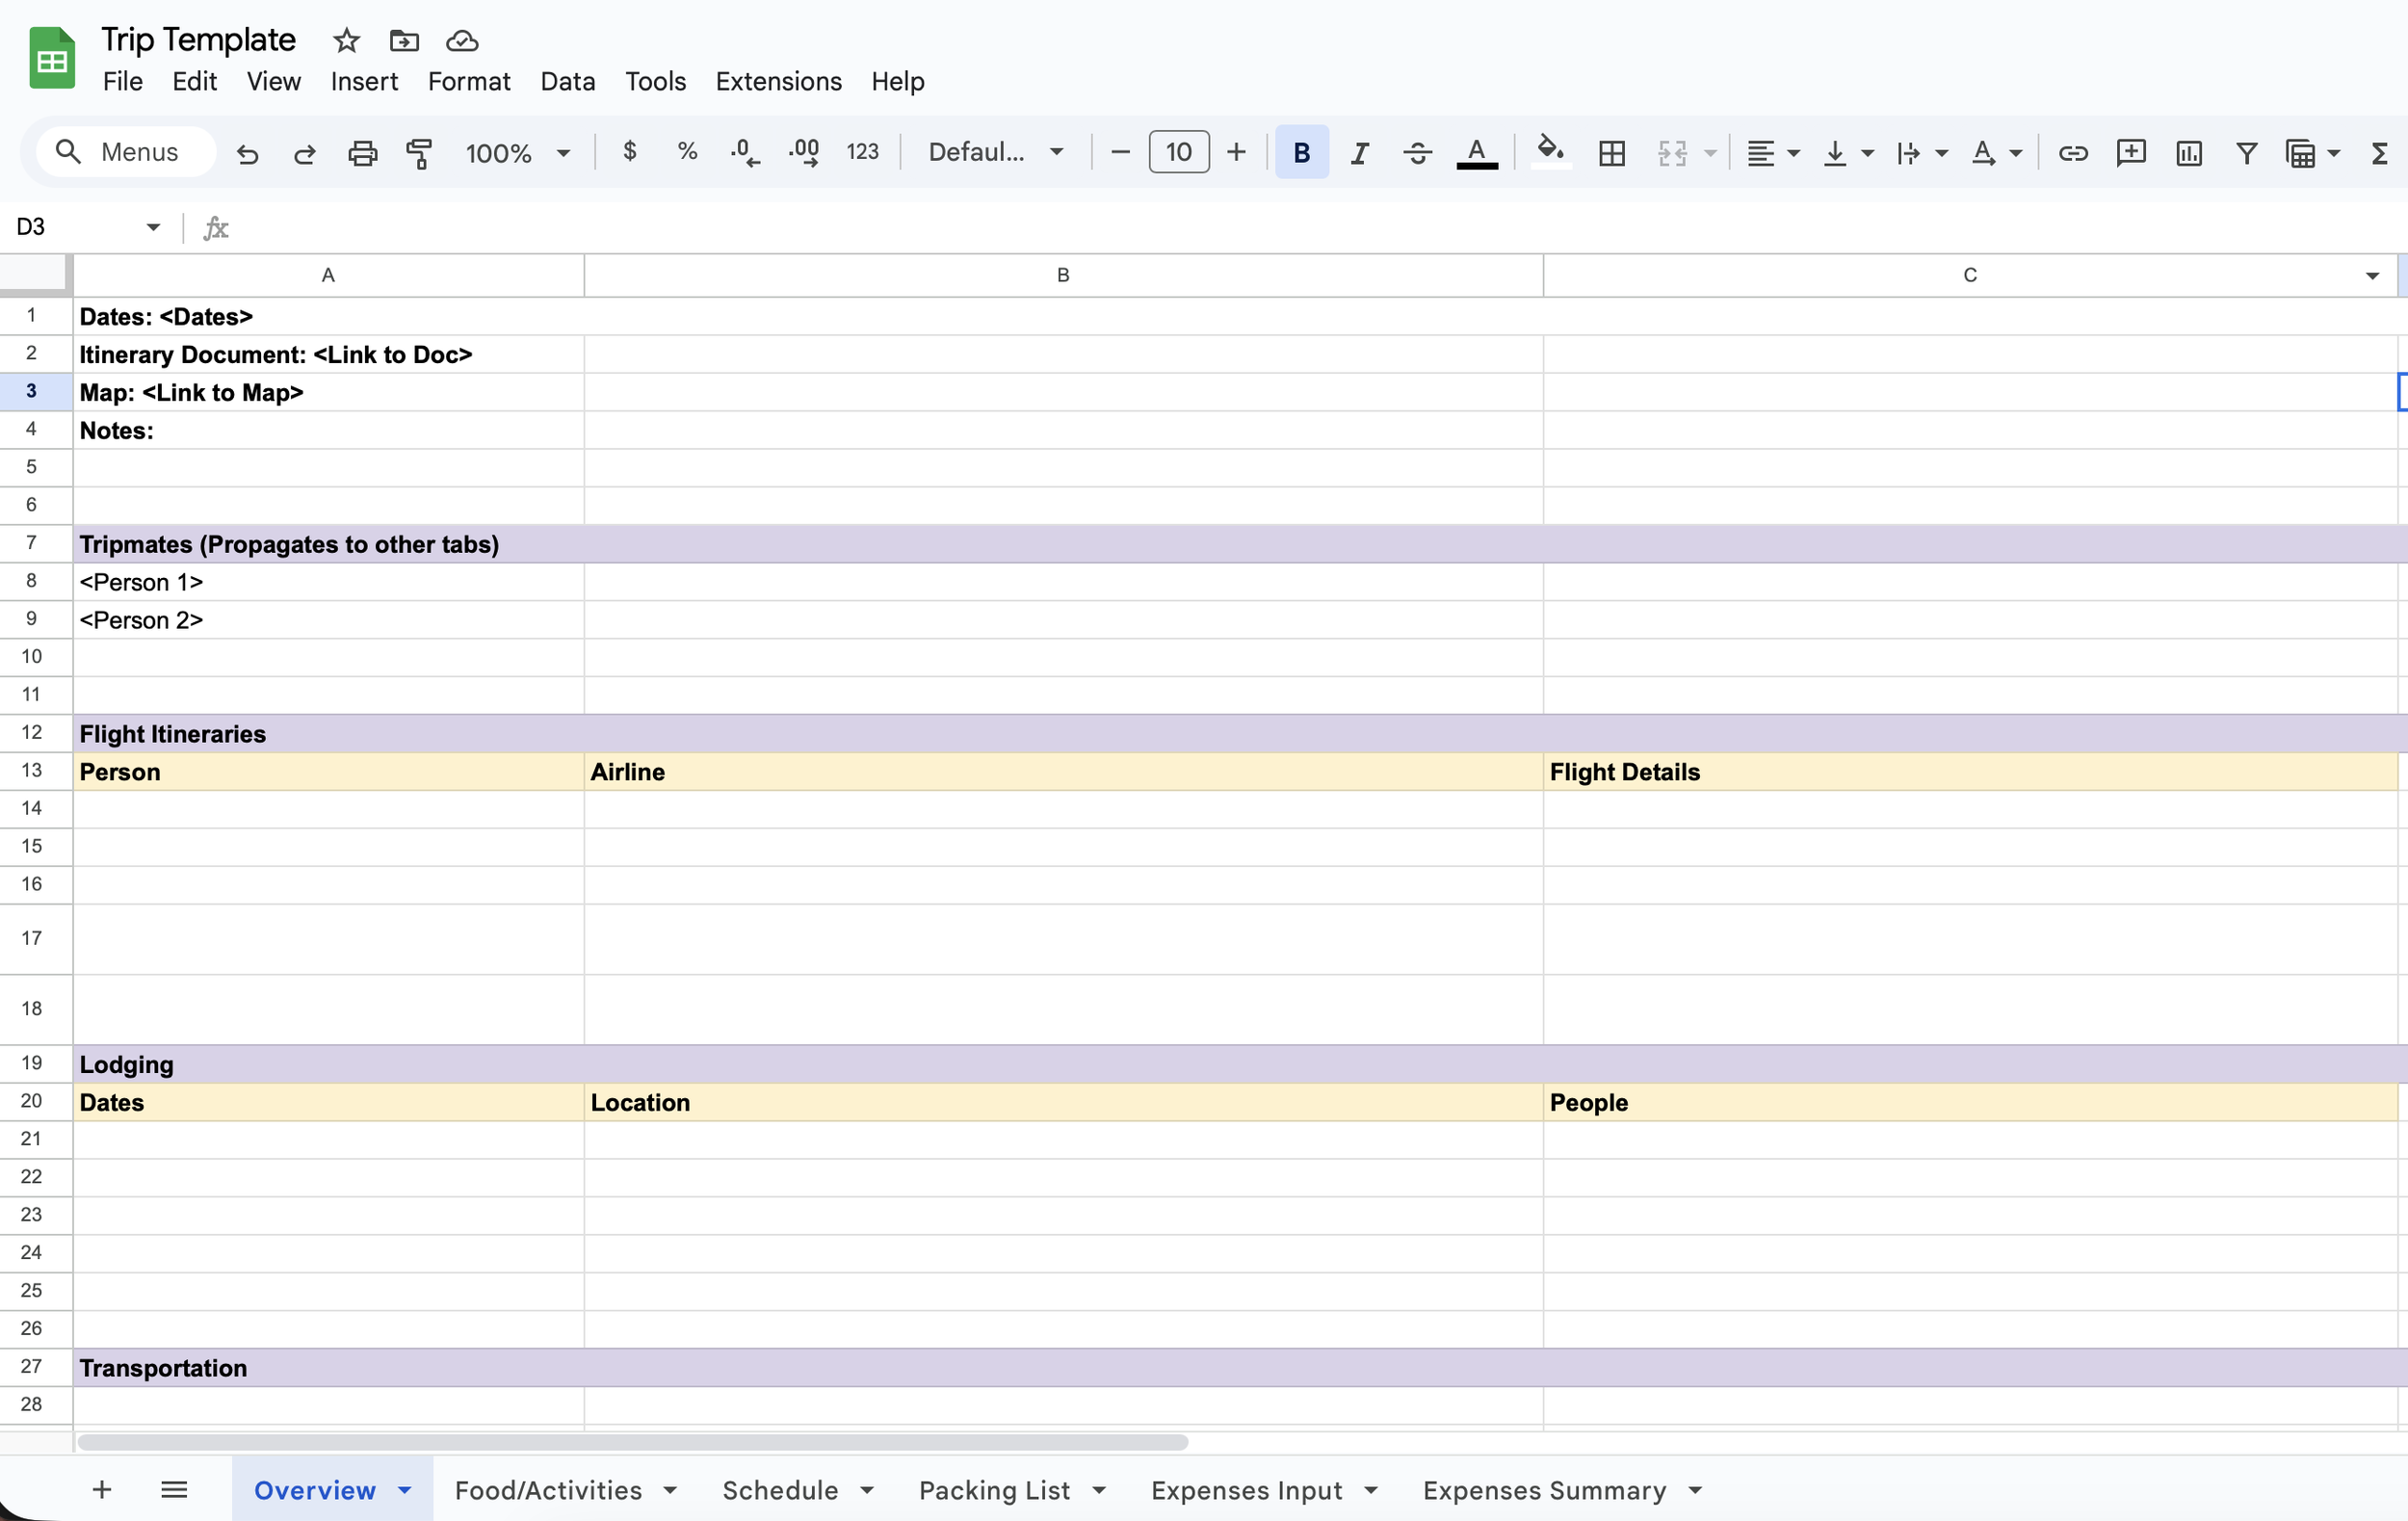
To start every trip, I’d start up a new Google sheet (off a trip template that I already had prepped). There’s one tab for general information like everyone’s flight info, lodging info with addresses, transportation, etc. This was the general tab for anyone to get some top-level information about the trip.
Next, I have a tab that is basically just a running list of food and attractions that everyone wanted to try / visit. This tab was available for everyone to input all of their suggestions and this is how we would gather all of the points of interest that I would then try to fit into an itinerary. Not everything can make it of course, but it doesn’t hurt to try ;)
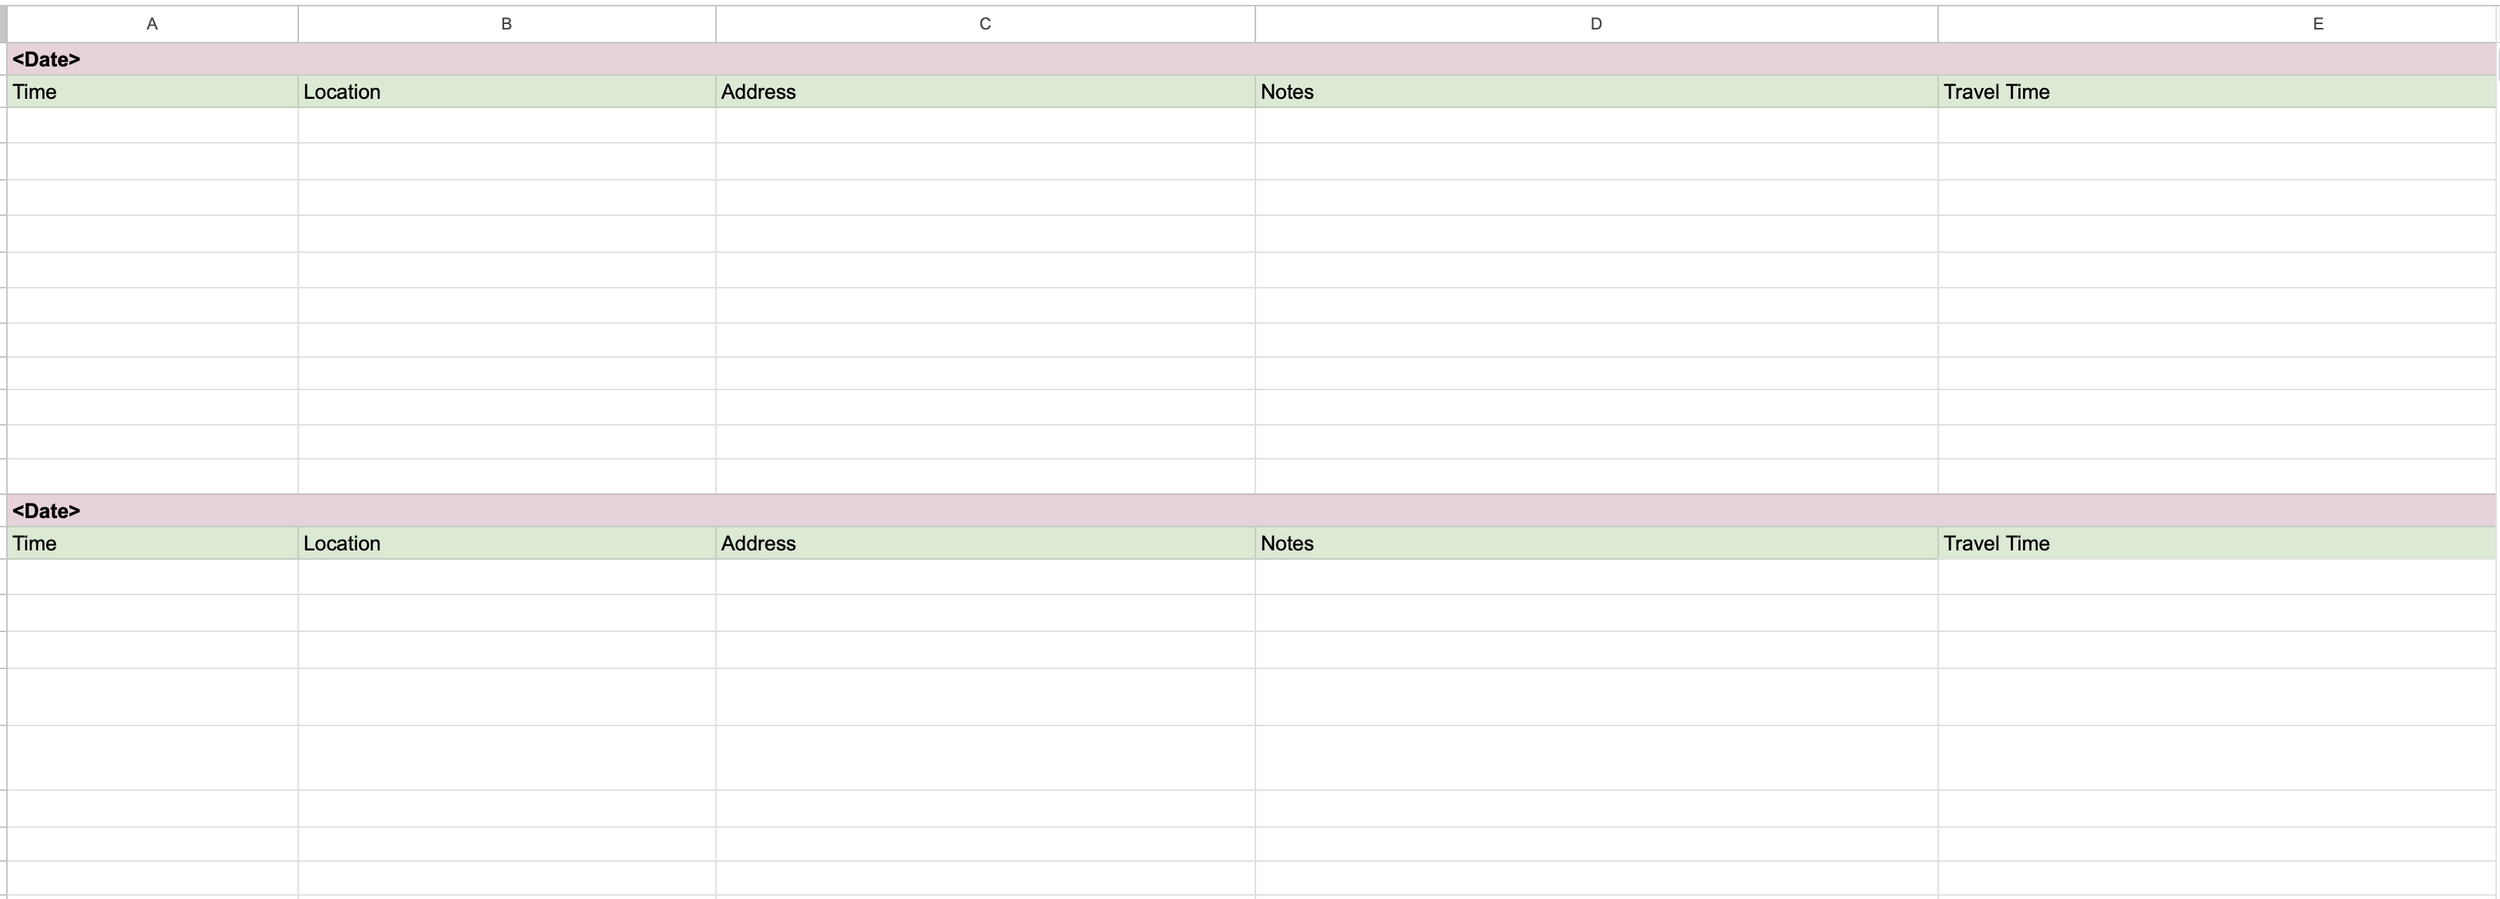
Then came the itinerary - the most important part! Each day was broken down, and here is where I’d fill in all the locations we wanted to visit, food, etc, with timestamps, notes about why we wanted to visit the place (like was there some famous dish we wanted to try?), hours of operation, and transportation notes between locations to figure out how much time we needed to allot to get from place to place. If applicable, I’d also include how much transportation costed (estimates off Google Maps) in order to get a rough idea of budget as well.
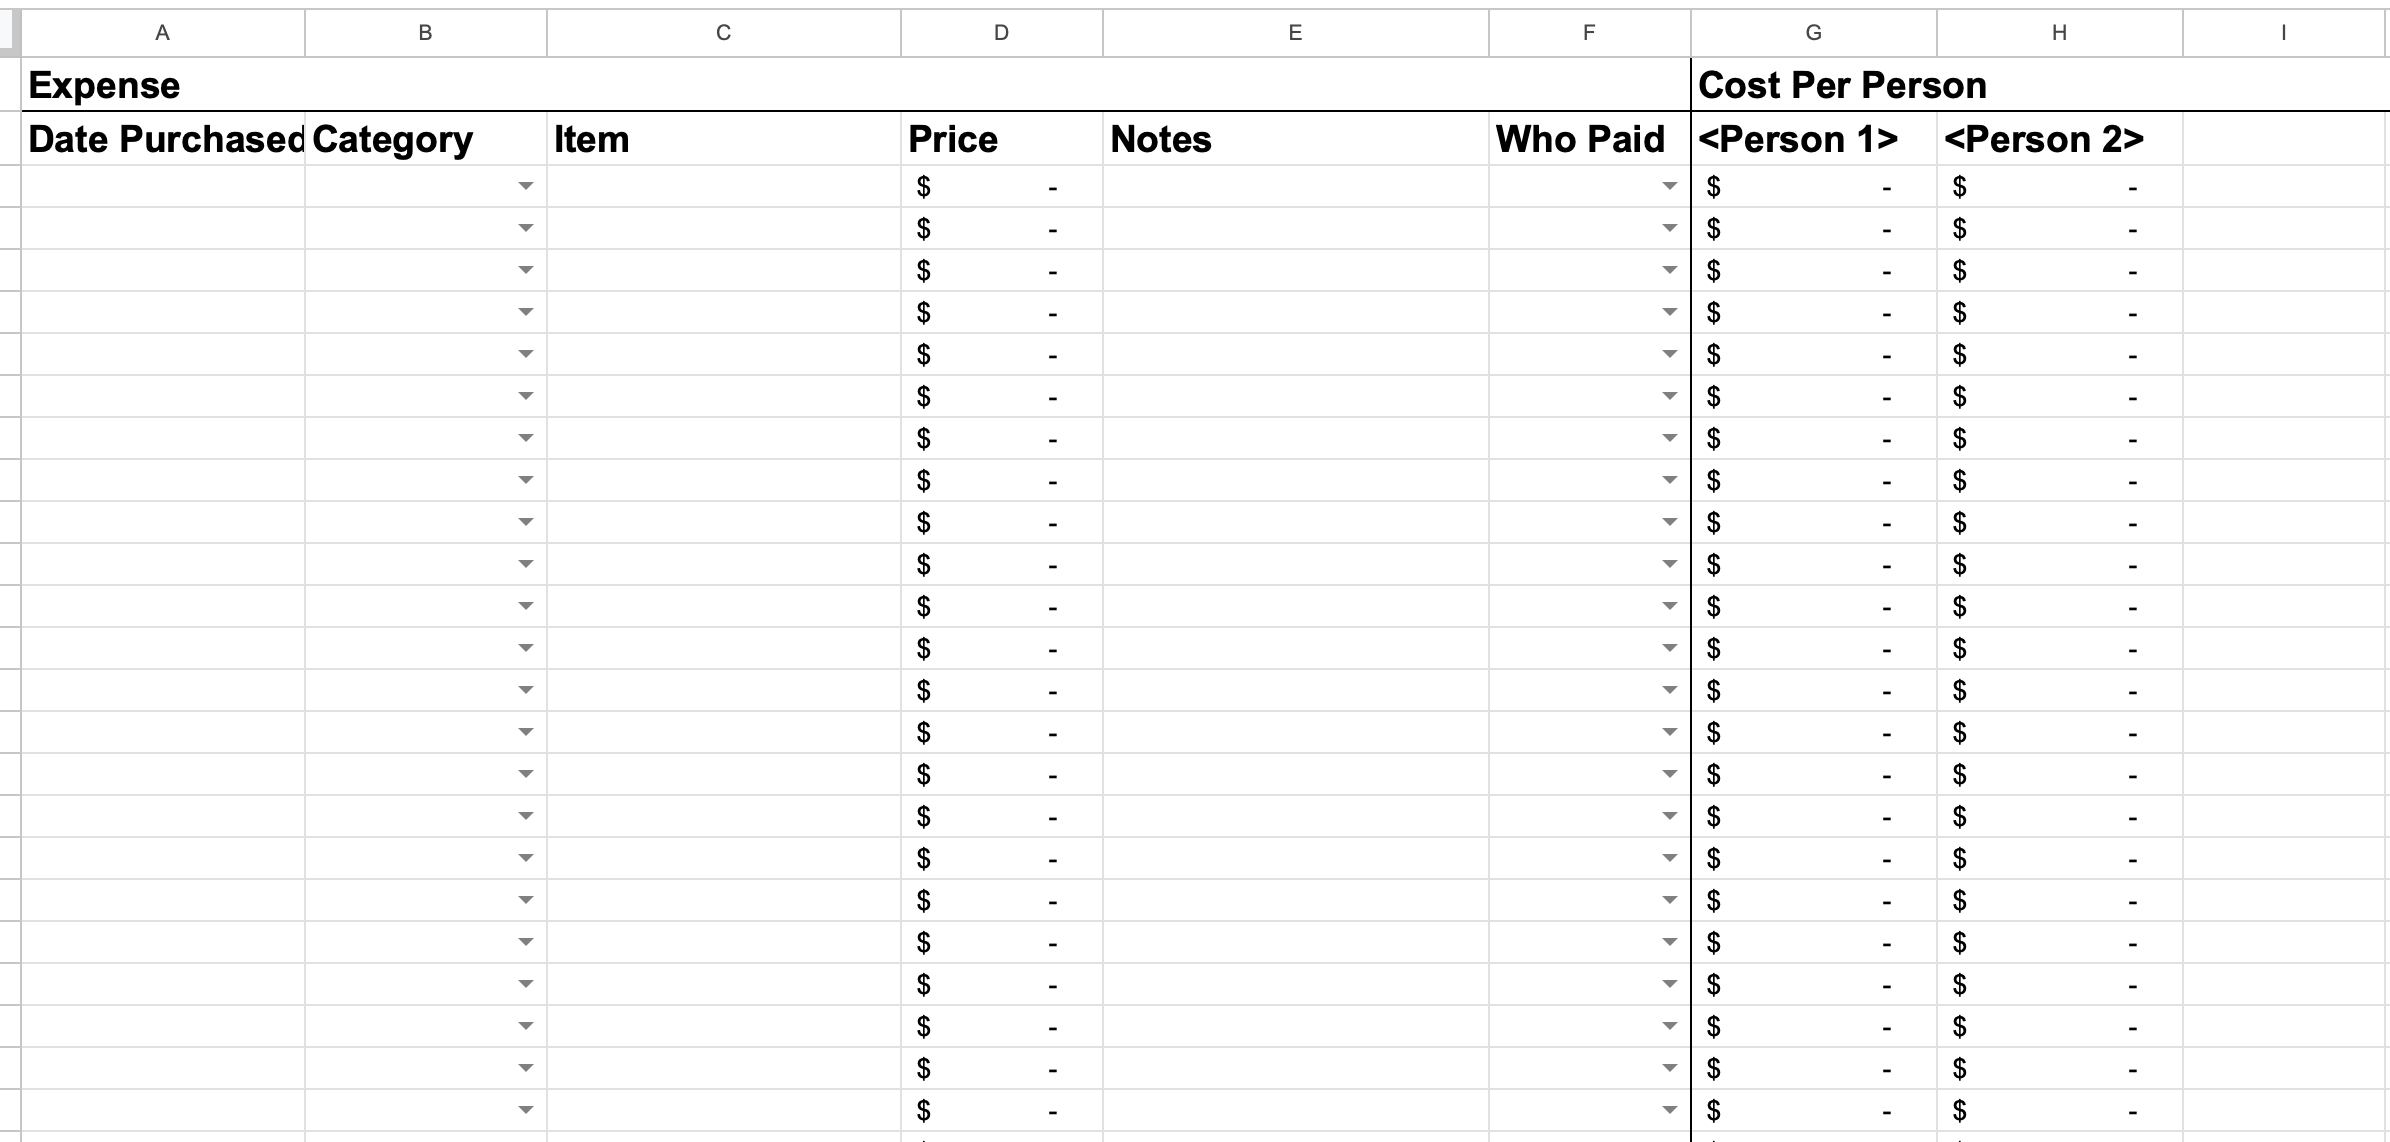
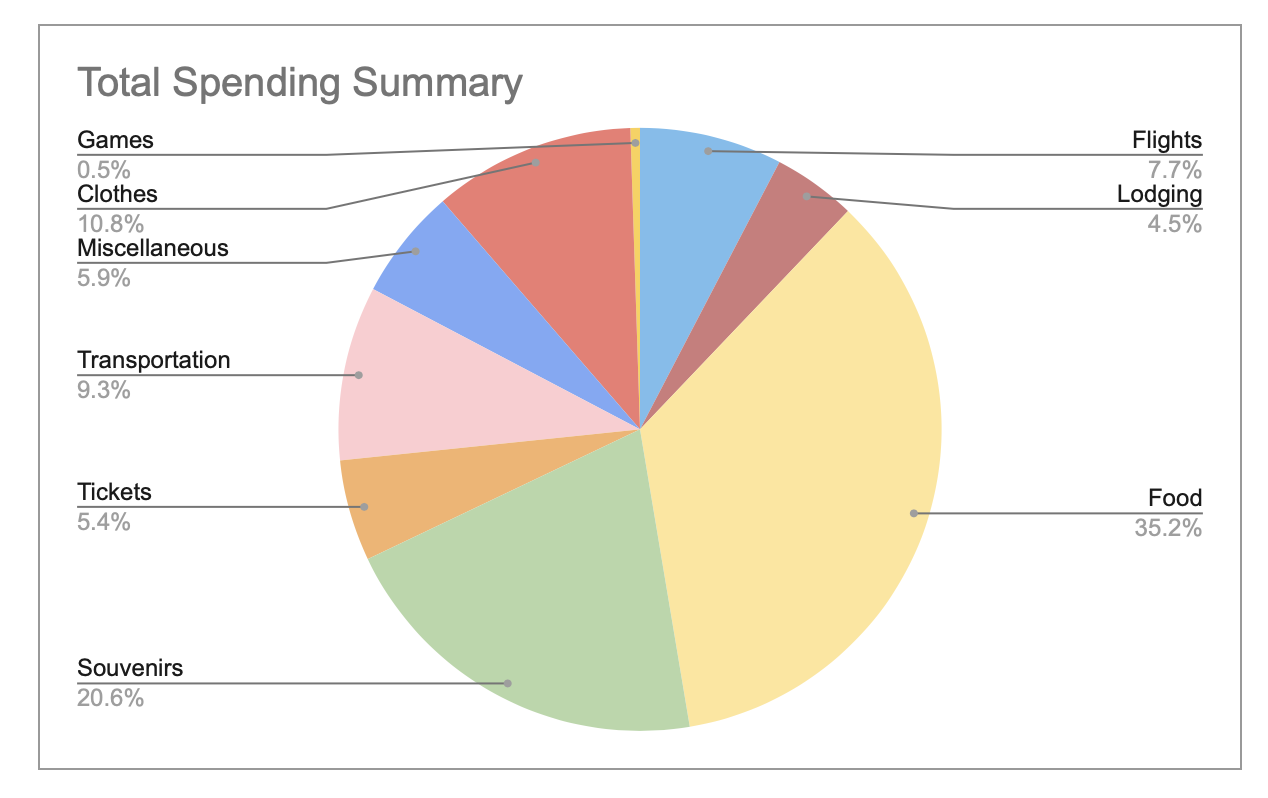
Finally, we have a tab for expenses. This is a good central place to record any shared expenses if we needed to divide up costs at the end of the trip. I usually would just save receipts until the end of the trip when we returned home, then divvy up the expenses afterwards. I personally prefer to do it this way because then you don't have to spend your time while you’re traveling doing stuff like this, but everyone has their own preference and it all depends on the comfort level of the group! I also personally just like to see at the end of the trip how my spending breaks down just for fun. So having all of these expenses recorded and categorized makes for a nice little fun pie chart!
When it comes time for the trip, I’ll usually print out a copy of the itinerary tab from Google Sheets. This way I can reference it during the trip if I need it or even manually mark down any changes if plans change. I’ve found that it’s helpful to have a hard copy just because I don’t always like to use my phone for checking the itinerary - I like to save my battery life for other things…like Pokemon Go! But, sans paper, the Google Sheets app is also easy to access on a phone and can accomplish the same goal.
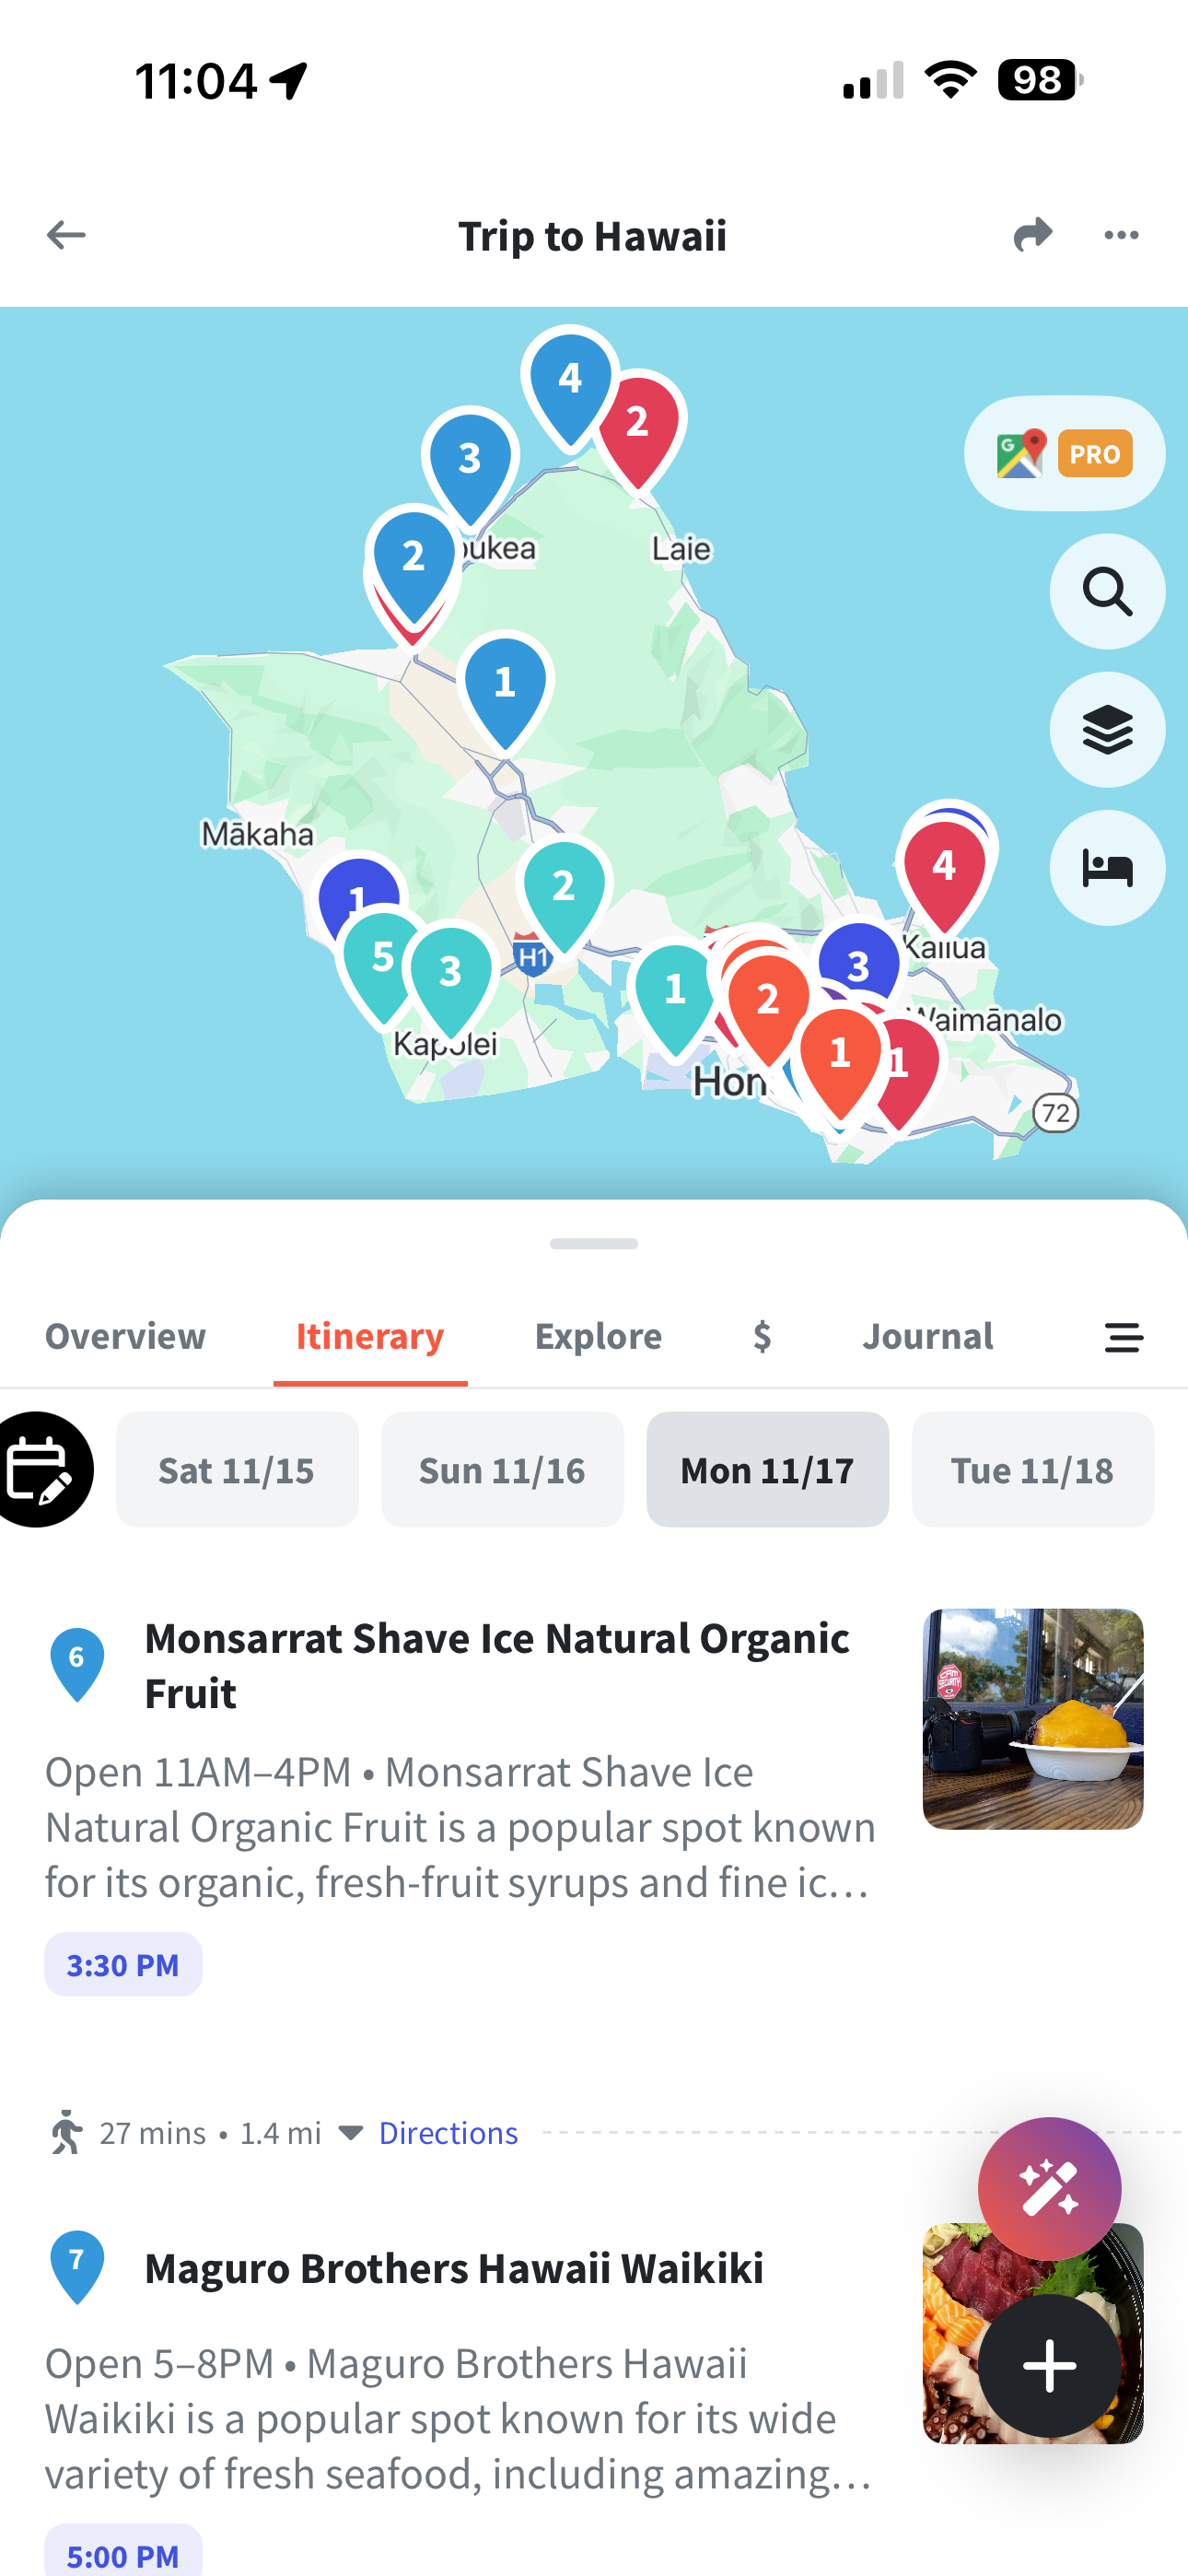
Google Maps
Here’s where Google Maps comes into play. For all of the food and attractions ideas that everyone throws into the Google Sheets tab, I add them to a “My Map” in Google Maps that’s dedicated to the trip.
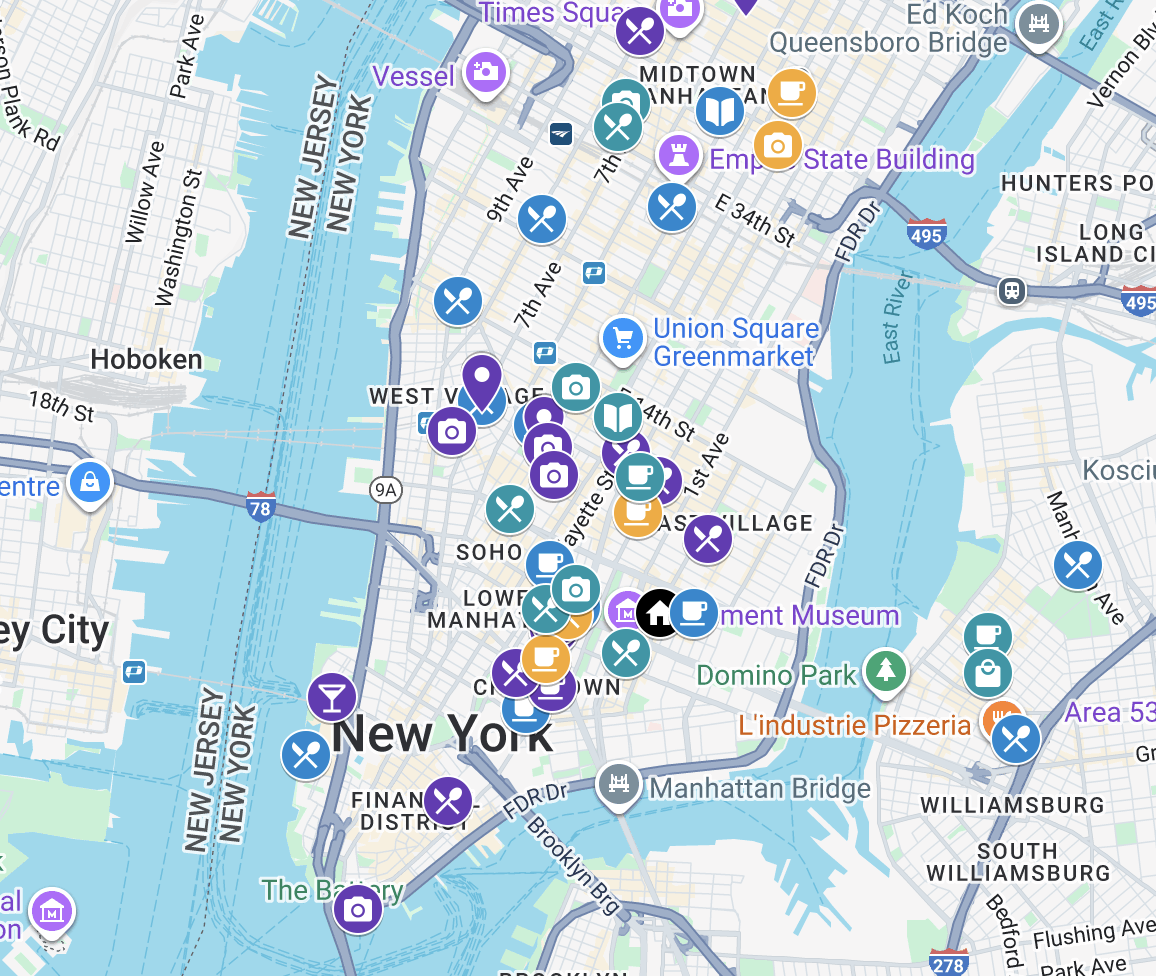
From here, it’s somewhat of an art of figuring out what locations would go well grouped together in a specific day. I try to avoid backtracking too many times or wasting too much time going back and forth from a location in the same day. I also try to group spots that are close together into a single day to avoid too much time going back and forth. I call this an art because it doesn’t always work out that everything you want to do in one area can be done on the same day. Sometimes, all those things are food and you can’t just eat all day (maybe some can, but I can’t). Sometimes, all the different locations have conflicting hours of operation, so it just doesn’t fit the schedule, or one activity takes longer than others. There’s also a balancing act to giving yourself enough time to enjoy a place, but also making sure you’re getting in your points of interest. So I do a lot of trial and error and try to keep unnecessary transportation at a minimum. Sometimes you have to accept that extra travel is necessary, but you try your best!
After I’ve grouped activities together by day and have a rough idea of the order in which I think everything should happen, that’s when I translate that into my actual itinerary with timestamps in the Google Sheet.
From here, it’s a bit of a back and forth between these apps, adjusting plans, maybe adding some new things, taking things away, etc. until I feel like there’s not much else to change. But it pretty much remains in flux until some point before the trip when I decide to lock down the itinerary and allow any further changes to be day-of decisions.
What I like about it
I really like all the flexibility that I have with these applications.
With Google Maps, I like visually seeing how far apart things were on my map and how things were clustered together so I could get an idea of what transportation between spots would look like, and get a sense of what neighborhoods we’d be in on different days.
Google Sheets is just a great place to see all the information at once. It’s easy to, at a glance, see timestamps and skim through the day’s details to get a sense of what we were going to be doing that day. Since you can make as many columns as you’d like or put whatever you want in the cells, I kept a structure to all the information so that it was easy for me to skim. Moving data around is also really easy so as I would adjust itinerary it was easy to move things across different days or re-order them as they made sense.
Some drawbacks
There are a couple drawbacks that come with this strategy, though they’re not so glaring as to outweigh how helpful it is.
Context switching
For one, switching between the two apps can be a bit tedious. If you have multiple screens, it’s maybe not so bad, but on a single laptop screen, they can both be quite demanding of screen real estate.
Keeping times in order
I also found that occasionally, I’d plan for a location on a date or at a time when it wasn’t open. This usually didn’t happen when I initially set the itinerary, but once I get into a re-adjustment re-ordering phase, sometimes I’d miss the hours of operation when moving things around and focused only on what felt most convenient from an ordering perspective. It doesn’t happen often, and a quick review of things goes a long way in helping avoid issues like that, but in the throes of things, sometimes it slips your mind.
Sharing
While the Sheet and the Map themselves are very easy to share out to a group, I do find that having everything only in text can be hard depending on who you’re sharing this information with.
For example, when planning a trip with my parents, I would send out the itinerary to get everyone’s eyes on it to see if they liked the way the plan sounded or to get any feedback, and the general feedback from parents would be that they don’t understand the plan anyway. They might not know what names of restaurants are or what specific dishes are called, so they have a hard time providing feedback and it’s not until we’re on the trip and we’re going to specific places that they indicate they had no interest in it, or whatever the feedback ends up being. In that same vein, even when sharing out the Sheet in the pre-planning phase to gather points of interest, they didn’t contribute because they don’t know names of places they want to visit. So things like that can be more difficult when everything is just text-based.
Overall
I would say that overall, Google Sheets and Google Maps as a paired solution still makes the most sense with the way my brain works and how I like to plan things. It’s efficient and no-frills, and helps me quickly and easily move things around and absorb a lot of information at once.
In execution there are some things that aren’t the smoothest experience, and it’s not always the best way to share the itinerary to a larger group. But it definitely gets the job done.
Wanderlog

This is a new app that I found somewhat recently, and I’ve been trying to use it more for my trips nowadays. It has mostly replaced my usage of Google Sheets and Google Maps while I’m testing out the functionality and seeing if it can stand as a permanent replacement. The jury’s still out on that, but it’s been a good experience so far.
How I found it
This really came about because of the example I mentioned above about my issues with sharing my trip with other people. I found that sharing a Google Sheet just doesn’t convey enough information at a glance to anyone who wasn’t poring over all the details like I was. I wanted to find an all-in-one place that could do a better job at conveying the trip details to others. I tried starting off with some Notion templates, tried other things, but nothing felt like it really solved the problem I felt like I was having and was as easy to set up as my existing planning apps. And that’s how I stumbled upon Wanderlog!
What I like about it

I really love how everything truly is all in one place! When you set up your itinerary, you set the location and the dates of the trip. There are separate sections for lodging, transportation, expenses, etc. You can create and customize any number of lists that work for how you plan things, and when you’re ready to move items to specific days in the itinerary, that’s all already set up and ready for you!
They allow setting starting and ending times for each activity, and when each item is set in a specific Day, the time it takes to transport from one place to another is already automatically calculated for you! You can even adjust the mode of transportation too and it’ll likewise recalculate.
Entering a new location into any list or Day also sets up a Google Maps visualization, which is essentially everything I already do in my original setup, but this time you only have to enter the location once, and it does it all for you!
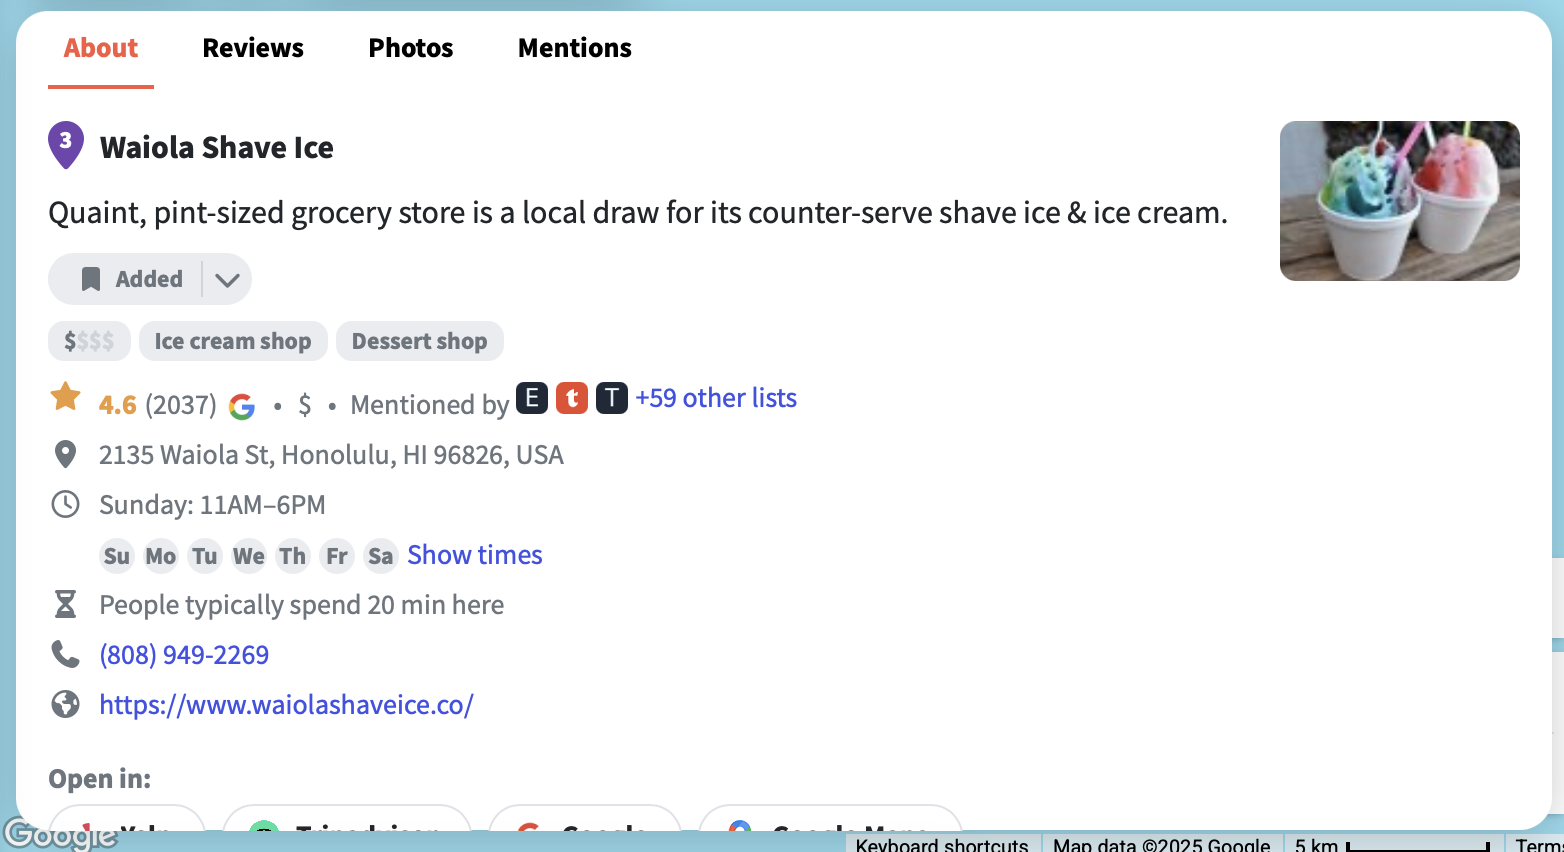
The first time I used this app, it really felt like everything that I do manually was taken care of! All I had to do was add locations in, and I could see it mapped out, I automatically got hours of operation, all the things! And what I really liked was if I added a spot to a Day when they detected the location was closed, I would get a notification that it might not be open. Such a time saver!
The itinerary planning is hooked in to Google Maps, so all the info you would get directly from Google Maps is already present as you’re planning. They also provide easy links to other websites related to the location like Tripadvisor and others if you want to cross-reference any other information.
The best part about this was that everything is so visual, and it’s all right there in front of you. For each location you can easily access the Google review photos so you could see immediately what a place was all about. You could see where everything is on the map so you don’t have to wonder where everything is or how far apart things are. This solved the issue I had of sharing an itinerary with others, because now they could see exactly what types of cuisine we’d be eating on a given day without having to look up what a dish is called or anything like that.
Paid Features
Wanderlog does offer more premium features like exporting your itinerary directly to Google Maps, and other AI-related things. All of the things I’ve done on the app so far have all been part of the free user experience. I haven’t felt the need to use any of the premium features, and as the application operates today (late 2025), it’s a super usable free application that has everything I think anyone reasonably needs to plan a trip without adding on any extra costs. I hope that continues to be the case if this app grows and that they won't gut any of the great functionality, but if that day comes, it’ll be back to Google Sheets and Google Maps for me.
How I use it
I use this app very similarly to my Google Sheets & Google Maps setup.
I’ve found that it’s best to start off with some generic lists where you can just dump any ideas or points of interest into. Once everything’s thrown in and you can see all the pins on the map, you can start to see what works best for which days. And as things are getting ironed out, you can move any of the locations to the respective day, and it’ll be correspondingly color-coded in the app (exactly what I do manually!)
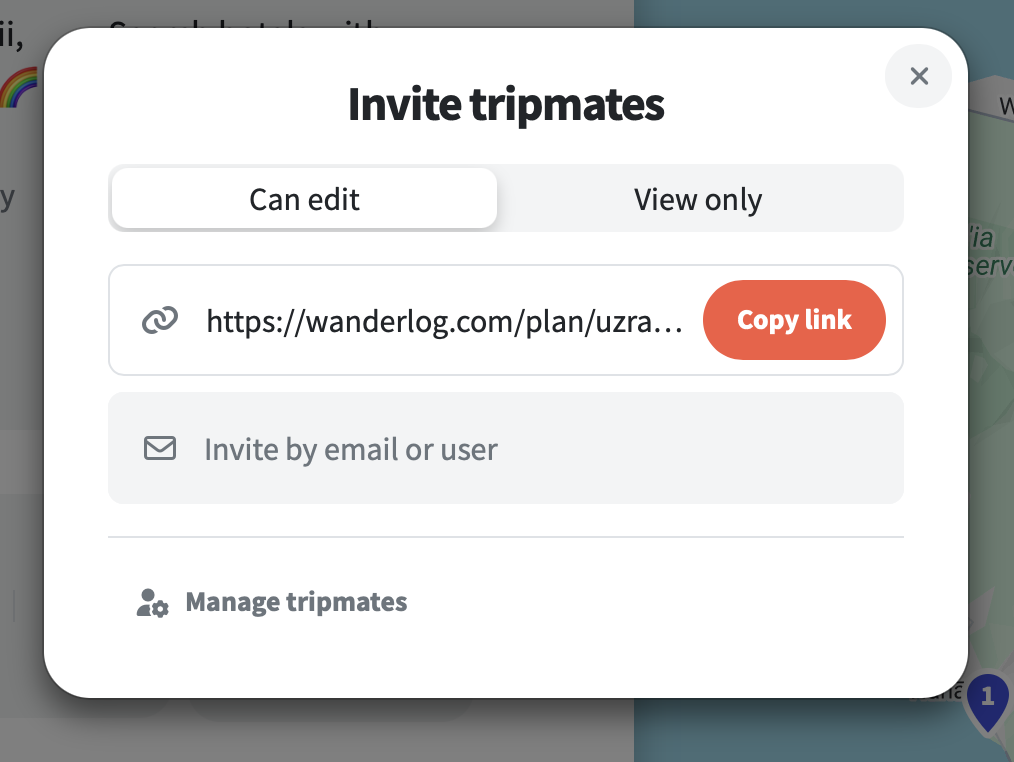
I can also share out the Wanderlog itinerary with tripmates early to get their input and their contributions, and they can adjust things themselves or offer up suggestions that I can use to make adjustments.
When we’re on the trip, I found that the Wanderlog app is nice to reference. The interface is really clean and it’s easy to scroll through the locations to check on what we’re doing next and things like that. Of course, you do need access to wifi or cellular data for something like this, and it does use up battery if that’s something you’re trying to conserve. But it doesn’t print out as nicely or efficiently as a Google Sheet, so the app is probably the best way to interact with it on the trip.
Some drawbacks
Data inaccuracy
As with a lot of technology that does a lot of things for you, you do have to remember that it can be wrong! This hasn’t happened often as far as I’ve experienced it, but there have been a couple of locations that the Wanderlog has told me a location is closed on a day I planned it for, but upon checking every website I could think of from Google Maps to the business’s own website and Instagram, all information says that they’re open. Choosing to ignore the Wanderlog warning, I’ve had success so far, so this is definitely a trust but verify scenario.
Luckily the opposite hasn’t happened yet where it appears open on Wanderlog but is actually closed. So if there’s going to be some inaccuracies I’d prefer it be the other way around!
Screen real estate
In Wanderlog, your itinerary along with all the other lists you’ve created are all stacked one on top of the other. And each location tile is quite large in height, so a lot of these elements take up a lot of the screen. To get from day to day takes quite a bit of scrolling if you have a lot of things planned for a day. I’m a very “at a glance” person. I like to see a lot of information quickly and succinctly when I’m planning because it helps me process information faster. All of the spacing and scrolling makes that aspect of planning a little more difficult for me even though it’s all visually very pleasing.
I will note that they do have a “Compact View” option which allows you collapse all of the location information to just the essentials. This is helpful but does still take up a lot more space compared to a celled sheet.
Transportation
This is just a small nitpick from my perspective as someone who likes to split everything up very clearly day by day. Wanderlog offers the ability to record any transportation from the trip, and this is actually also something that I do in my manual planning process. I actually like to route my entire itinerary and use the estimated transportation costs from Google Maps to budget accordingly, so I liked that they had this feature.
However, all of the transportation is organized into its own separate list visually separated from the day the transportation is meant to take place. I like seeing these things together so I know how much certain journeys are going to cost as well as roughly how much I expect to spend on a given day. It also helps to make sure you haven’t missed a leg if these elements aren’t connected.
So in practice, the Transit section that’s set up in the app is not that useful in my opinion.
Usability in different regions
One thing I was not aware of was the limitations with Wanderlog when it came to traveling in regions where Google Maps is not supported, since Wanderlog relies on Google Maps for all of the routing.
If you’re traveling to somewhere like China, the Wanderlog locations may not be accurate because Google Maps does not have the accurate data to begin with. And, while I have yet to experience it myself since I haven’t traveled to China yet, I’ve read online that Wanderlog itineraries are not editable while in the country because Google Maps is blocked. I believe, based on other people’s accounts, that you can still view your itinerary, so at least you’d have that. But any adjustments you’d make on the trip will have to be done offline or through some other medium. This would be where having a hard copy itinerary that you can scribble on might be more useful.
Overall
In general, I think this is a really helpful and useful app that takes a lot of manual work out of planning, which is nice and convenient! Some of the drawbacks are personal preferences on my end, and I think I still have a bit of preference towards my more manual planning process. There’s a comfort to that legwork that I actually quite enjoy.
However, I think Wanderlog is a great way to build out a shareable itinerary for a group.
Notion

I know that Notion is a very powerful tool, and for years I keep coming back to it to try to find a way to make it useful for me. I haven’t had much luck, to be honest, but I think I’ve now found a consistent use for Notion that has actually been quite helpful on my past trips: outfit planning!
How I use it
Because it’s easy to use put in a bunch of templated data and have it displayed in an organized way, I use Notion to plan out all of my outfits for my trip!
I start with a Notion template outfit planner, put in all my clothing items that I wanted to bring with me along with photos of each item.
If you’re curious, this is the template that I used.
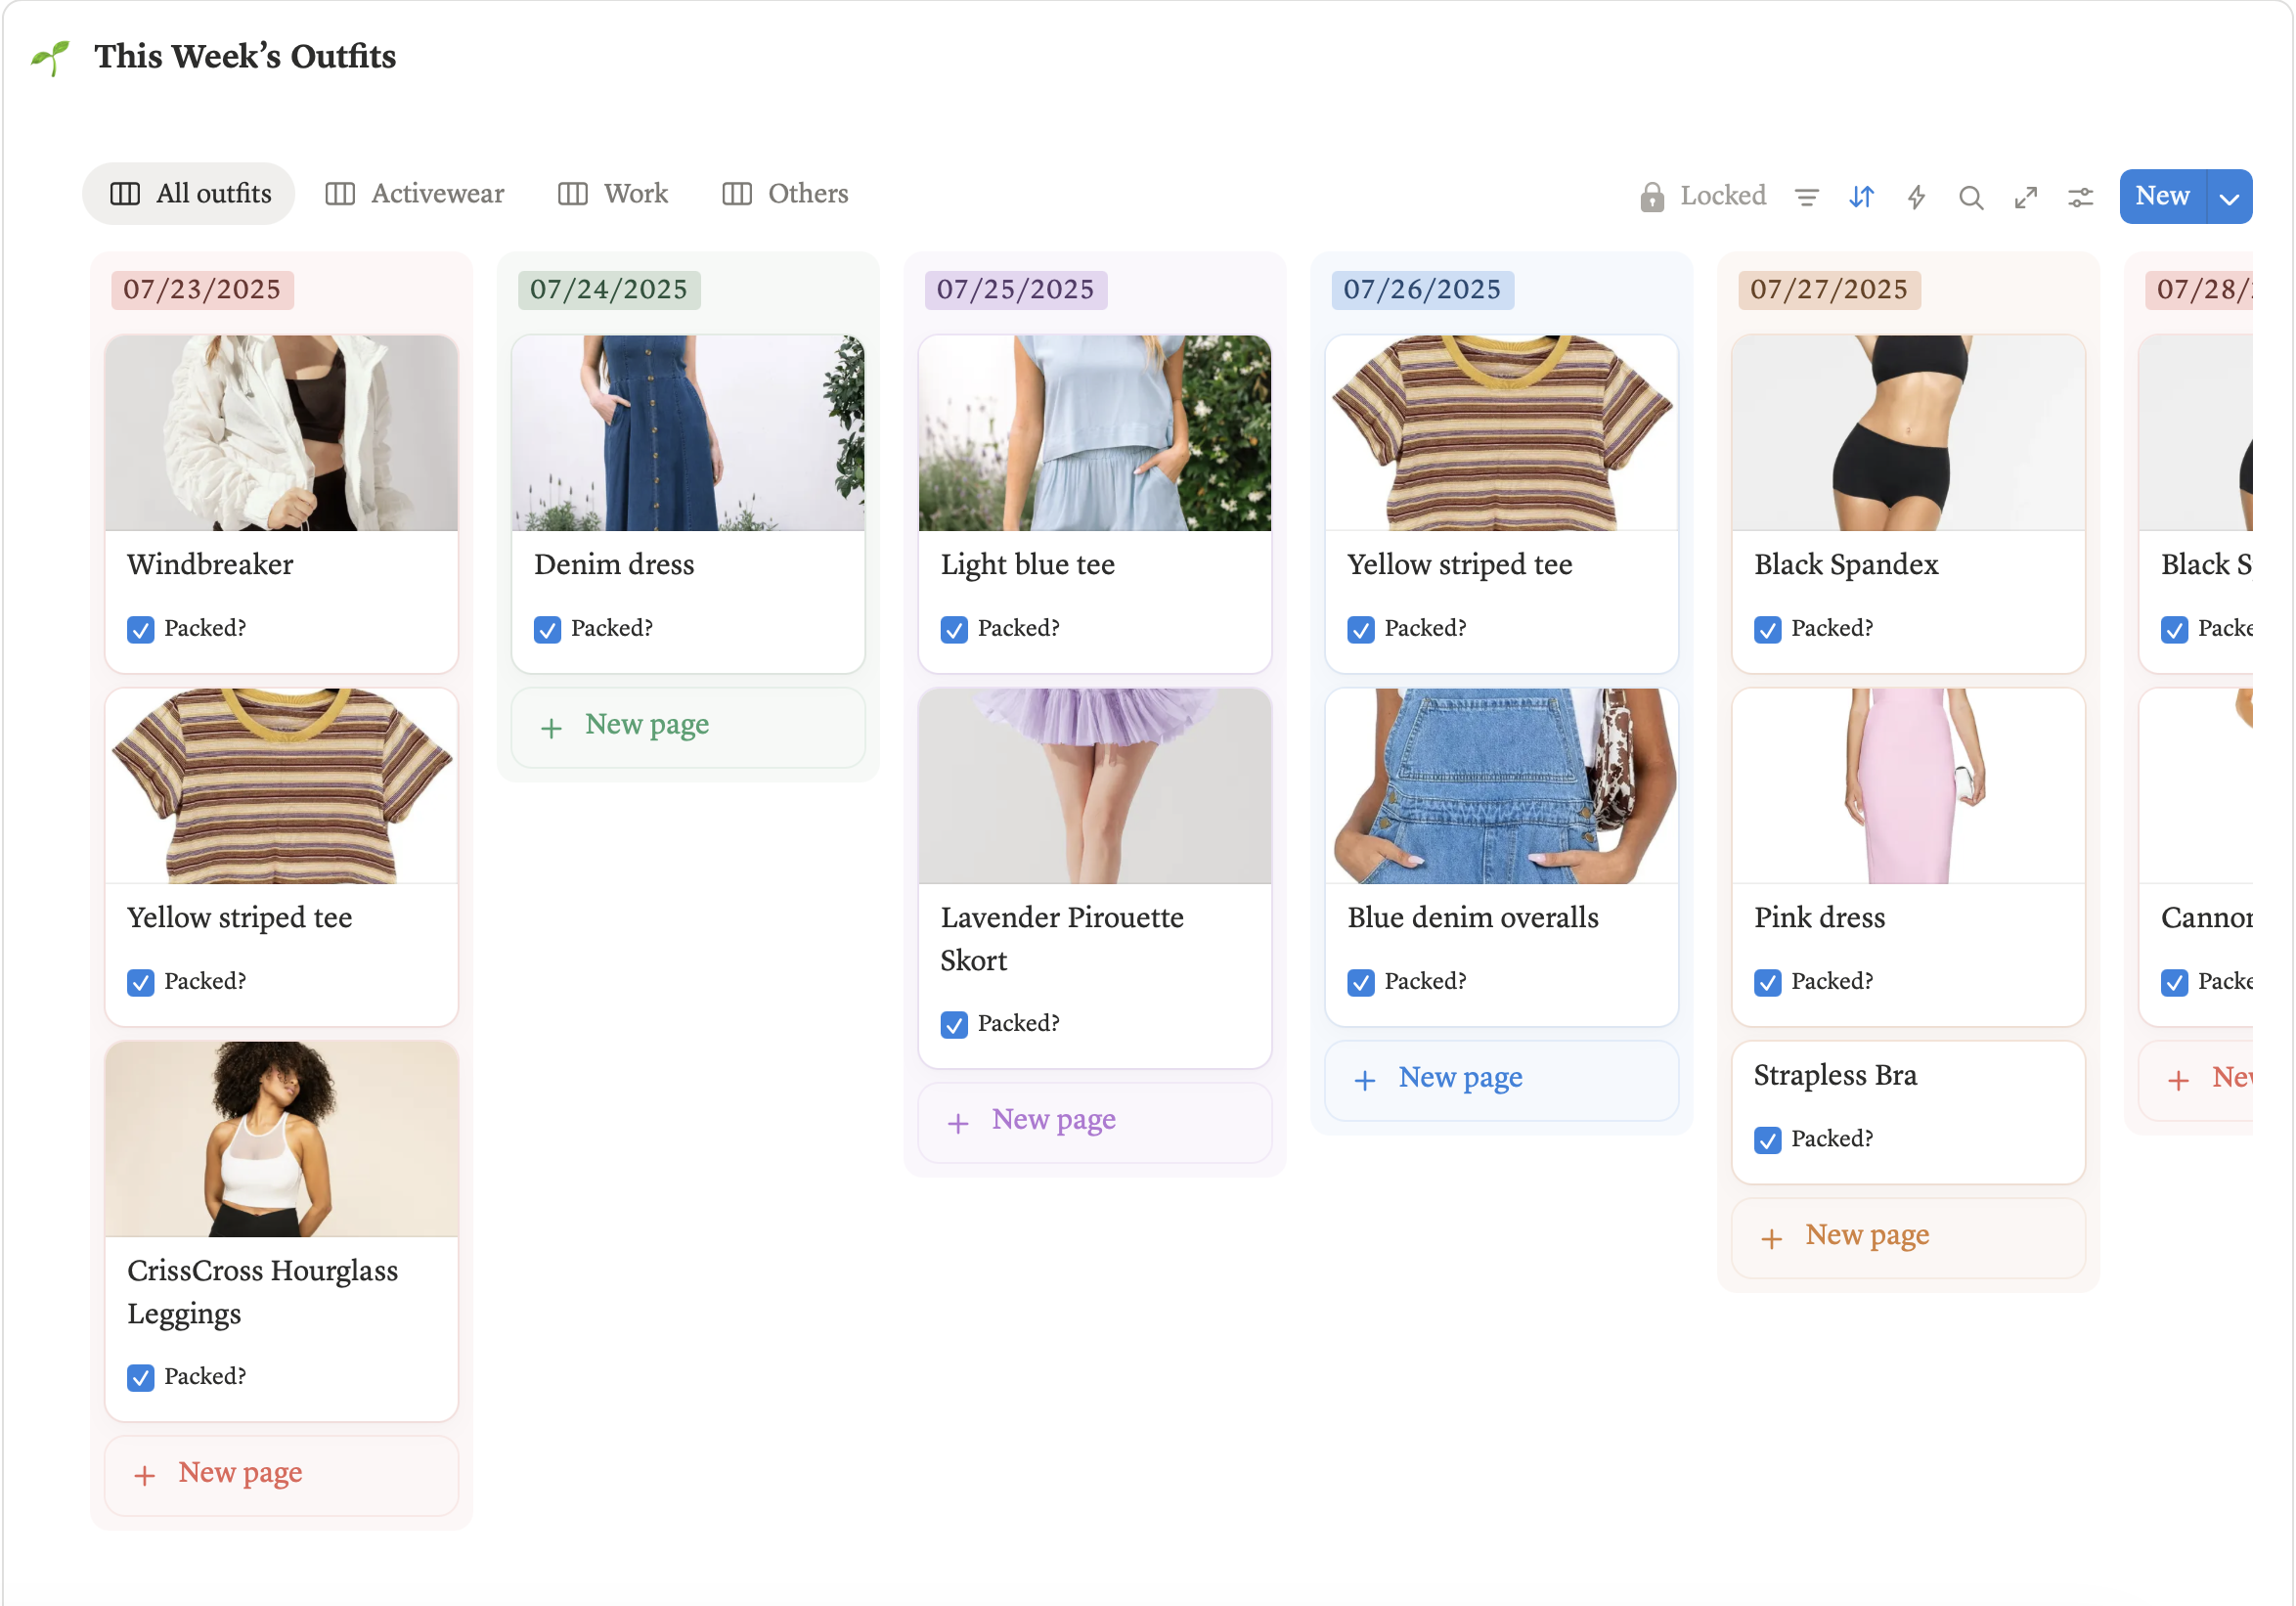
I organize them into “Day” columns and move items around to put together outfits that I would want to wear for each day of the trip. This allows me to visually see what the outfit will look like to see if I like it, and I can see how many times I can use the same garment for the trip to limit overpacking. And, it helps me determine if/when I need to do any laundry on the trip - if I wear a few items several times and still plan to use it, I’ll need to find time to wash it.
This also helps me not forget to pack a specific item that I want to bring along for an outfit as well, like if I want to dress on-theme for specific days (i.e. Disneybounding at the Disney parks).
Then when I’m actually on the trip, all I have to do is reference my Notion app and see what I had planned for the day. Since I did all the thinking before I left, it removes any time wasted struggling to figure out what to wear every single day. I’ve started doing this for my last few trips and it’s been so convenient. I love just putting on the outfit I had pre-planned without worrying that I’m wearing something too much, or that I wasted luggage space bringing clothes I didn’t need. I highly recommend doing something like this on your next trip, even if you end up doing something a little more generalized and not so day-to-day specific!
What I like about it
I love that I can visually see how each item goes together, and it’s super easy to re-arrange.
You can also automate certain fields in each item, so I have a counter for how many days an item has been assigned to. This lets me know if I’m choosing to wear something too many times or not enough times. If I see I only chose to use an item once during my whole trip, I can decide whether or not it’s worth it to bring, or if I should just replace it with something else I’m already planning on packing.
The app is really easy to use, and it’s just so easy to reference it while I’m on my trip. And if I feel like changing things up mid-trip, I can always do that! But I love that it’s just one less thing I have to think about, and it makes getting ready so much easier!
Everyone’s planning and organization strategies are very personal, so however you like to plan your trips, I hope they’re as magical and fun and you hope for them to be!
These are just a few of the ones that I personally leverage heavily when planning my trips as someone who really likes to thoroughly plan my day to day activities!
If trip planning is stressful for you or not your strongest suit, I hope these can give you a launching off point or some guidance as you start planning your own magical adventures!